
A good trek followed by watching the sunset lying tucked under your tent on the hilltop can be fun. You have to buy a tent to turn this vision into reality or learn to make a tent all by yourself.
If you are thinking of it as a random idea, here’s a myth breaker – there are so many things that can act like reliable inputs to make the DIY tent.
Contents
Essential Requirements For Tent Making
Before making a camping tent from scratch, let’s discuss some building blocks you’ll need to make the tent.
- A tarp, in case you want your tent to spread over the sheet that covers the ground
- Strong and thick wooden sticks that can act like the tent peg
- Choose between a bungee cord that should be a minimum of 20 feet or a long and strong paracord rope.
8-Step Guide For Camping Tent Making
Here are some steps you should follow to set up your camp without any problems or last-minute issues.
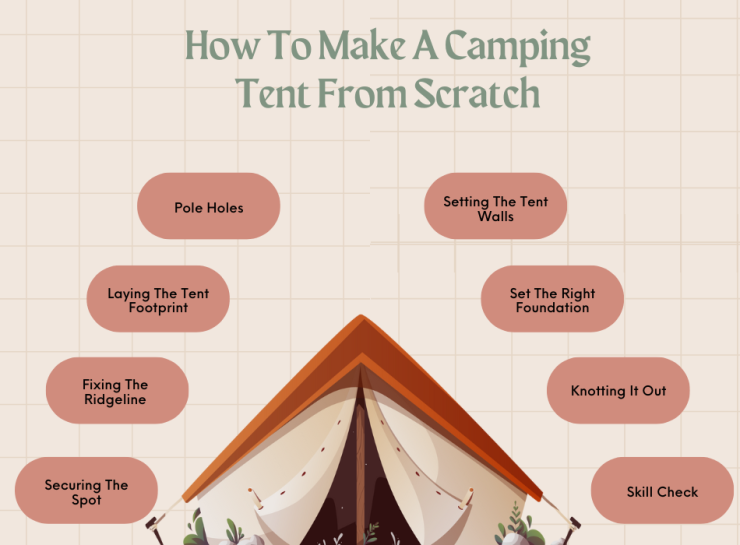
#1: Securing The Spot
The first step toward learning to make a tent from scratch is choosing the right spot for making the tent. It is nothing short of a treasure hunt. Choosing the right space for your tent is incomplete if you are not taking care of the following steps:
- Don’t choose a very rocky or hard terrain but don’t go for a soft soil base either. Choose a good combination of both of them.
- Keep a check on the availability of elements of protection near the place where you wish to make your tent.
- Don’t compromise on environmental factors like the availability of shade, trees, or temperature for dryness and moisture. They are important to make your camp stay comfortable and memorable.
#2: Fixing The Ridgeline
After you are done with your location selection, the next thing you should do is tie the ridgeline between two trees. Ensure that the trees are at least 8-10 feet apart. Use a paracord to do this step. If you want a longer tent, you should tie your rope at a good height. But, don’t go too high as it will be difficult for the rope to reach the ground from other ends.
#3: Laying The Tent Footprint
Use the tarp to create the tent’s ground. It should be strong. So, what you can do is make 4 holes surrounding the tarp corners. Place the stakes here, and don’t forget to keep a check on the diameter so that the size is correct. Also, the holes should be of the normal size, neither too big nor too small for the sticks to get in them.
#4: Pole Holes
The next thing you should do is cut the paracord to ensure its length. Each hole in the 4 corners should be in touch with these 4 pieces of the paracord. It is an important step so that you and later use these poles and the connectivity to set the tarp so that it does not move at all.
#5: Setting The Tent Walls
Use the second piece of tarp and move it over the ridgeline so that your tent walls are in place. The step is important; without it, it would be difficult for the walls to stand erect in harsh weather conditions.
#6: Set The Right Foundation
No matter how hard you try, it will be incomplete until you see your camp fixed strongly to the ground. Use the holes on the ground and fix them parallel to the holes on the tarp placed on the ground’s upper side. You can consider using a mallet if making the right size of the hole is problematic.
#7: Knotting It Out
The base and the levels are ready. The only thing left to be done tying the overall structure so that you can secure the progress completed by now. Invest some time in learning some camping knots, which will help you complete this process better.
In other cases, if you have not learned this skill, secure the overall progress with two knots. But, ensure that these knots are strong to hold the structure tight. If you are not sure, you can go for another knot. You can also use the paracord pieces for tying the tarp on the top of your camp.
#8: Skill Check
The last thing is to check your camp’s skills. Your camp should be strong enough to carry its weight and keep the inmates safe in hot and cold conditions. Once your camp is put, you should make a checklist and see whether everything is done correctly or not. Push the poles but not hardly. Keep all your requirements in the camp and get ready to experience a fun time.
Conclusion
Congratulations! You just made your trekking and camping journey much better.
Turns out that making a camping tent yourself is easier than you think, right?
All you need is the right ingredients and follow the steps properly. That’s how you’ll get your very own tent and will be able to make it anytime you need.
You can convey your thanks for these steps later. For now, go, grab all the ingredients, choose a place, and try it out. After you finish, sit back and see how lovely and strong your first DIY tent looks.
FAQ’s

What are the possibilities of making one’s simple tent?
There are many ways of making a strong tent. The tent’s durability depends on the materials it is made from, so it is always suggested to go for strong and durable products like a strong cover and base. It will ensure the tent’s durability during strong winds.
What kind of sheet is used for covering the tent?
If you want to make a tent for play purposes for the kids, the best idea is to use colorful and printed bedsheets to cover the head of the tent.
What should the canvas of a DIY tent be like?
DIY tents for various purposes like camping should have a cotton canvas. Also, some durable tent material options like nylon and silicon. They enhance the overall protectiveness of tent inmates.
References:
https://www.rei.com/learn/expert-advice/tent-set-up.html

I love to explore the outdoors, cook over a campfire and pitch a tent. I want to share my adventures with you by writing articles, taking pictures, and sharing videos.